OK so a friend of OA ask me to write an article about SmartOS, seriously i try but i don’t know what its up whit the ISO file of that project that wont boot up! i mean i download from this server a file call “latest.iso” it didn’t boot… later on i download another ISO file, an older version this time, the version was (20120726T184637Z). and it didn’t boot up either, so i decided to not leave the things like that and went to a similar project named OpenIndiana, is almost the same thing. BTW i am guessing that my friend want an article about this… because first there is like ahhhhh ZERO documentation, second he has to be focusing on Visualization technology. We are going to make some articles about that but not with SmartOS. Fare well lets start this installation walk trough.
Ok first thing you need to know about OpenIndiana is that it has two version, the desktop version and server version, we are going to work whit the server version which has no X11 whatsoever. I tested this installation on a VM sponsored by Virtualbox, what a great project that is Virtualbox indeed, ok moving on… First step …create and configure the VM so we can install an OS on it.
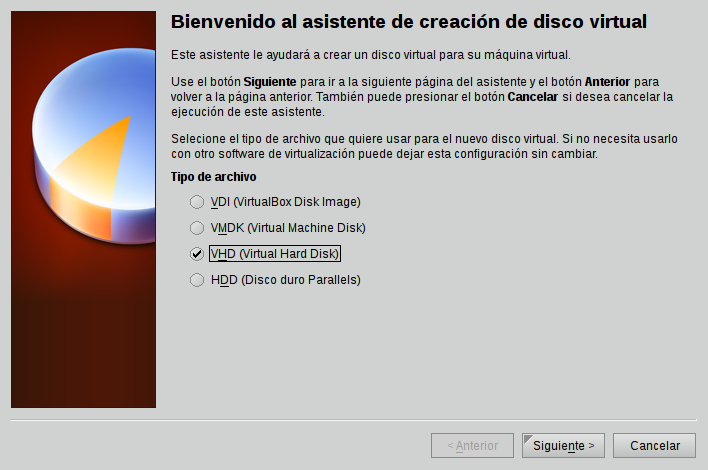
IMPORTANT DO NOT USE REGULAR VDI DISK IMAGE FOR THE INSTALLATION IT WILL NOT WORK. OPENINDIANA WOULD NOT DETETCT THE HARD DRIVE AND YOU WILL HAVE TO REBOOT OVER AND OVER UNTIL YOU FIGURE IT OUT THAT WHAT YOU NEED IS A VHD [VIRTUAL HARD DRIVE].
Like i am showing you here in our first pic:

Ok now lets start installing this OS. Put the VM ready to boot from the ISO file of OpenIndiana and you will get classic UNIX start screen whit name of OS and stuff, the second thing is two or trhee menus where you select keyboard layout and language settings, after that comes the fun part, starting whit this screen right here:

As you can see i select one (1) and continue to this other screen:

Ok, a Welcome message that is nice, quickly hit F2 to continue to this other screen … but remember where the install log is, just in case:

Good, like I told you, if you were running the install process whit the regular Virtualbox hard drive emulation, you wont be seeing this screen. You are welcome. Hit!! F2 and continue to this:

Set the Hostname, also set the NIC in auto. Keep going pressing F2, and this screen will follow:

Time Zone, I didn’t choose Asia seriously i don’t know how the cursor end there when i took the screenshot, anyway choose your time zone and continue to the next screen:

See, Venezuela! that is not on Asia right ? OK then case close …. select your location and move on:

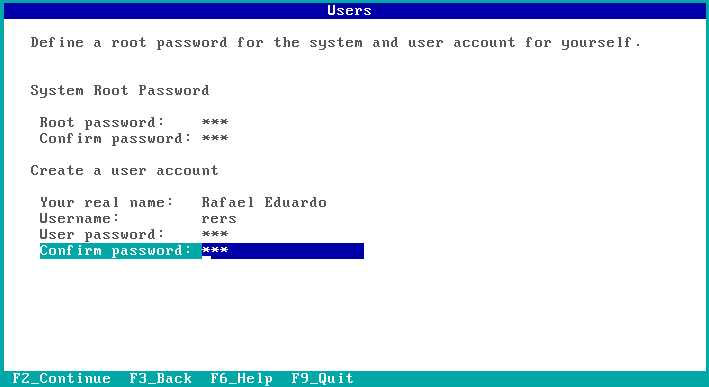
The root password assignation screen, choose your password and more F2 to continue:

Your last chance to check everything is OK. Fine press F2. And then you wait until is done. The system takes like one hour to install fully. And another thing is… and i don’t know if it was just me, but if you take too much time to select one of the choices in the whole installation process the systems hangs and you will need to reboot the VM and start all over again so be aware. after that is done(the copy of the files to your hard drive) you will see this next screen:

Finally you are done and its time to do that good old reboot and check your new OS. After change the boot parameters in the VirtualBox VM to hard drive first, you will find the GRUB boot loader and the systems takes apx 1:30 [ one minute and thirty seconds to be up and running]. After you log on you can see quickly this OS is based on Solaris. But i will make another post about the using of OpenIndiana later. So hope you like this walk trough and find it useful. Bye.
Hey brother. Nice work. 😀
Do you have VT-x extension on your system? You can check in virtualbox too.