Installing The software.
Virtualbox
https://www.virtualbox.org/wiki/Linux_Downloads
Download the package for your distribution, we are using Fedora so choose the corresponding RPM package. To install correctly we will need the Linux kernel headers installed.
yum -y install kernel-devel kernel-headers
Install the Virtualbox package in fedora is very easy you can double click the icon or run rpm -i package as root user. After check the install log.
cat /var/log/vbox-setup.log
Debian Gnu/Linux the net install version will work.We will assume you know how to install a Linux distribution. We will skip the installation process. At the end of the setting the virtualization environment you will have something like this:
How to make the machines ping each other
this is a must without connectivity the cluster would not work at all, so this is a interface configuration you can apply
-
Inisde VM – OS level
cat /etc/network/interfaces
————for Internet connection——-
auto enp0s3
iface enp0s3 inet dhcp
———use with Vbox NAT setup——
————Cluster network setup Node 1———-
auto enp0s3
iface enp0s3 inet static
address 10.0.0.102
netmask 255.255.255.0
———use with Vbox NAT-NETWORK setup—
————Cluster network setup Node 2———
auto enp0s3
iface enp0s3 inet static
address 10.0.0.101
netmask 255.255.255.0
———use with Vbox NAT-NETWORK setup—
Now the you have two Debian machines working we can start the setup. We will need the following software. Also we need to have ssh server installed on both of the machines so we proceed as follows:
aptitude install openssh-server
We need the computers communicate SSH with no password for that we proceed:
root@node-1:~# ssh-keygen
root@node-2:~# ssh-keygen
root@node-1:~# ssh-copy-id root@192.168.2.102
root@node-2:~# ssh-copy-id root@192.168.2.101
After that install the Cluster packages. Execute as follow:
aptitude install crmsh pacemaker heartbeat corosync
Then after a successful install edit the, hosts file on each of the cluster nodes and add the respective instructions:
root@node-1:~# cat /etc/hosts
127.0.0.1 localhost
192.168.2.101 node-1
192.168.2.102 node-2
root@node-2:~# cat /etc/hosts
127.0.0.1 localhost
192.168.2.101 node-1
192.168.2.102 node-2
Ok so the next thing to do is:
root@node-1:~# corosync-keygen
root@node-1:~# scp /etc/corosync/authkey node-2:/etc/corosync/authkey
chown root:root /etc/corosync/authkey
chmod 400 /etc/corosync/authkey
After that edit the following (edit or add):
nano /etc/default/corosync
START=yes
scp /etc/default/corosync node-2:/etc/default/corosync
Next is the corosync .conf file
service {
# Load the Pacemaker Cluster Resource Manager
ver: 1
name: pacemaker
use_mgmtd: yes
use_logd: yes
}
totem {
version: 2
secauth: off
cluster_name: mycluster
transport: udpu
}
nodelist {
node {
ring0_addr: 10.0.0.101
nodeid: 1
}
node {
ring0_addr: 10.0.0.102
nodeid: 2
}
}
quorum {
provider: corosync_votequorum
two_node: 1
}
logging {
fileline: off
to_stderr: yes
to_logfile: yes
logfile: /var/log/corosync/corosync.log
to_syslog: yes
syslog_facility: daemon
debug: off
timestamp: on
logger_subsys {
subsys: AMF
debug: off
tags: enter|leave|trace1|trace2|trace3|trace4|trace6
}
}
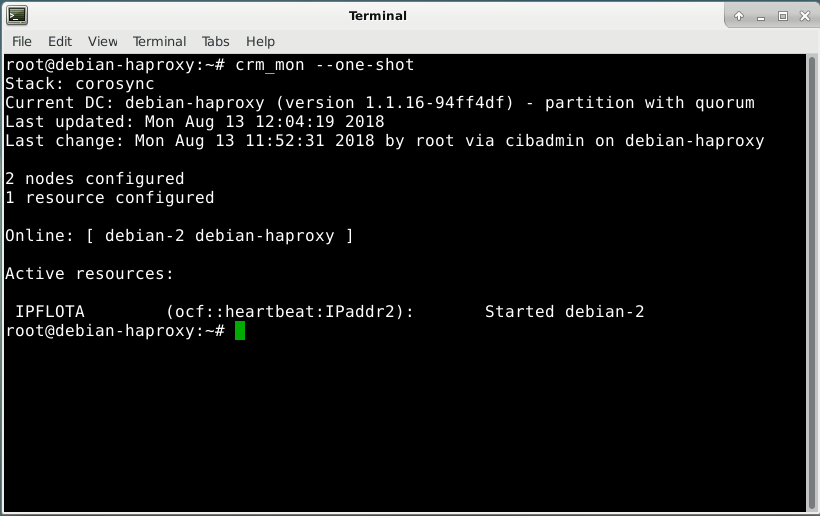
Call cluster status command you will get that result. the resource will show without extra network (nic) modifications